Battery switch on travel trailer function is crucial for managing power, preventing backfeeding, and ensuring safe operation. This guide covers everything from understanding the different types of switches and their wiring to troubleshooting problems and performing essential maintenance. We’ll explore how these switches control power flow between your tow vehicle and the trailer’s house battery, highlighting best practices to keep your system running smoothly and efficiently.
We’ll delve into the intricacies of battery switch operation, examining common issues and providing practical solutions. From identifying symptoms of a faulty switch to performing safety checks and upgrades, this guide provides a comprehensive understanding of this essential travel trailer component. Whether you’re a seasoned RVer or a newbie, mastering your battery switch is key to a trouble-free camping experience.
Understanding Battery Switch Functionality in Travel Trailers
Your travel trailer’s battery switch is a crucial component, managing the flow of power between your trailer’s batteries and its electrical system. Understanding how it works is essential for safe and efficient use of your RV. This section will cover the different types of switches, typical wiring, and safe operation procedures.
Types of Battery Switches Used in Travel Trailers
Travel trailers typically utilize one of three main types of battery switches: a simple on/off switch, a dual battery switch, and a battery combiner. A simple on/off switch is the most basic, offering only the ability to connect or disconnect the battery from the trailer’s electrical system. A dual battery switch allows you to independently control two batteries (often a house battery and a starting battery for the tow vehicle).
Battery combiners, on the other hand, allow you to connect or disconnect batteries and, importantly, charge them simultaneously from a single source, like your tow vehicle or shore power.
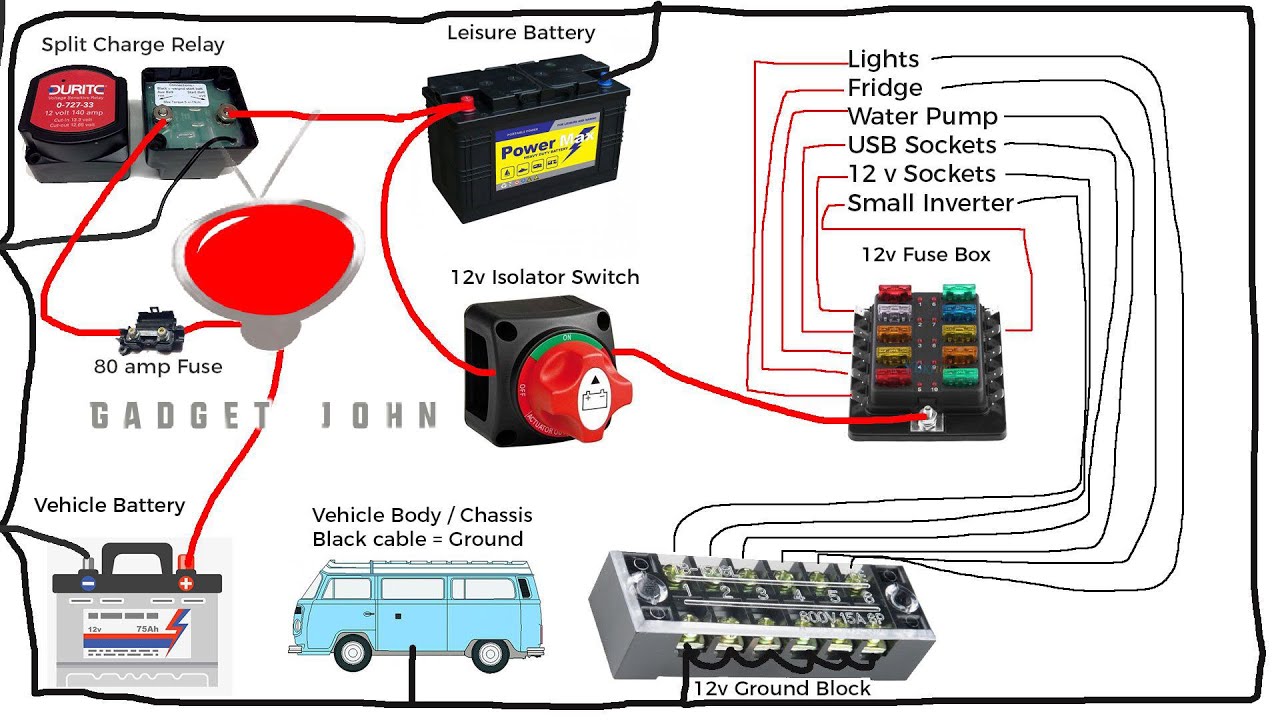
Typical Wiring Diagrams for a Battery Switch System
A basic on/off switch setup involves a single wire running from the battery’s positive terminal, through the switch, and then to the trailer’s distribution panel. The negative terminal is typically connected directly to the chassis. Dual battery switches usually have two positive wires (one for each battery), each passing through the switch and leading to the distribution panel. Both negative terminals may connect directly to the chassis or to a common ground point.
Battery combiner systems often have more complex wiring, including diodes or relays to manage charging and prevent backfeeding. A detailed schematic is always recommended for proper installation and understanding. For instance, a common dual battery switch setup might show two separate positive leads from each battery, each going through its own switch position, before converging to a single point feeding the trailer’s electrical system.
Operating a Battery Switch: A Step-by-Step Guide
Before operating any battery switch, ensure you understand its specific configuration. Incorrect operation could damage your electrical system or create safety hazards. For a simple on/off switch, simply flip the switch to the “on” position to connect the battery and “off” to disconnect. For a dual battery switch, consult the switch’s labeling to identify each battery’s control and operate accordingly.
With battery combiners, familiarize yourself with the different positions and their functions (e.g., “both,” “battery 1,” “battery 2,” “off”). Always double-check the switch’s position before and after use. Remember to turn off all appliances before switching off your battery to prevent damage.
Comparison of Battery Switch Types
| Feature | Simple On/Off | Dual Battery Switch | Battery Combiner |
|---|---|---|---|
| Number of Batteries Controlled | One | Two | Two or More |
| Independent Control | No | Yes | Often Yes (depending on the model) |
| Simultaneous Charging | No | No | Yes |
| Cost | Low | Medium | High |
Battery Switch and Power Management: Battery Switch On Travel Trailer Function
Your travel trailer’s battery switch is the central control for managing power flow between your tow vehicle, the house battery (or batteries), and the trailer’s electrical system. Understanding its function is key to preventing electrical problems and ensuring a smooth camping experience. It acts as a gatekeeper, directing power where it needs to go and preventing unwanted backflows.The battery switch’s primary role is to isolate the house battery from the tow vehicle’s charging system and the trailer’s 12-volt system when not actively charging or using the house battery.
This prevents the house battery from draining the tow vehicle’s battery, or vice versa, and also protects against accidental short circuits. In most setups, the switch offers several positions, typically “Off,” “Battery,” “Both,” and sometimes “Tow.” The “Battery” position connects only the house battery to the trailer’s 12-volt system. “Both” connects both the tow vehicle’s charging system and the house battery to the trailer’s system.
“Tow” might only connect the tow vehicle’s charging system for charging the house battery. The “Off” position completely disconnects everything.
Preventing Backfeeding
Improper use of the battery switch can lead to the house battery backfeeding power to the tow vehicle. This happens when the switch is left in the “Both” or “Battery” position while the tow vehicle is not connected, and the house battery is supplying power to the trailer’s systems. If the tow vehicle’s battery is weaker, the house battery could attempt to charge it, potentially damaging both batteries.
Okay, so you’re dealing with your travel trailer’s battery, right? Knowing how to use the battery switch is key. Check out this super helpful guide on the battery switch on travel trailer function to understand the basics. This will help prevent accidentally draining your battery. Then, for more in-depth info on managing your power, including the battery switch on travel trailer function and its role in overall power management, this resource is fantastic.
It covers things like preventing parasitic drain and maximizing battery life. Get familiar with both, and you’ll be a pro in no time!
The switch’s design prevents this by physically disconnecting the tow vehicle’s electrical system from the house battery when the switch is in the “Battery” or “Off” position. Think of it like a valve in a plumbing system—it controls the flow of electricity.
Common Battery Switch Issues
Leaving the battery switch in the “Both” position when disconnected from the tow vehicle can drain the house battery. The trailer’s 12-volt systems will continue to draw power from the house battery even when not connected to the tow vehicle, eventually leading to a dead battery. Similarly, forgetting to turn the switch to “Off” while storing the trailer can lead to a slow drain on the house battery due to parasitic loads (small electrical draws from devices in standby mode).
Another common problem is a faulty switch itself. A malfunctioning switch may fail to completely isolate the circuits, resulting in unintended power flow and potential battery damage.
Power Flow in a Travel Trailer System
Imagine a simple flowchart:[Descriptive Text of Flowchart]The flowchart would begin with the tow vehicle’s battery. An arrow would lead to the battery switch. From the switch, there are three branches: one going to the trailer’s 12V system (lights, pumps, etc.), one to the house battery, and one ending at a dead-end (representing the “Off” position). The switch’s position determines which path(s) the power takes.
Okay, so you’re wondering about your travel trailer’s battery? It’s super important to understand how that battery switch works. Check out this helpful guide on the battery switch on travel trailer function to learn about proper usage. Knowing how to use it correctly prevents drain and keeps your trailer running smoothly. This is especially important for longer trips, and understanding the different switch positions is key.
Another great resource, focusing on the electrical side of things, can be found here: battery switch on travel trailer function for more in-depth info. Mastering this will save you headaches down the road!
When the switch is in “Both,” power flows from the tow vehicle battery to the trailer’s 12V system and also charges the house battery. In the “Battery” position, power flows only from the house battery to the trailer’s 12V system. In the “Off” position, all paths are blocked, preventing any power flow.
Troubleshooting Battery Switch Problems

A faulty battery switch or related wiring issues in your travel trailer can lead to frustrating power problems. Understanding the common symptoms and troubleshooting steps can save you time and potential headaches on the road. This section will guide you through identifying problems, performing basic checks, and using a multimeter for more in-depth diagnostics.
Common symptoms of a problem with your battery switch or its associated wiring include a complete lack of power to your appliances, inconsistent power (intermittent operation), unexpectedly rapid battery drain, or the inability to switch between battery banks. These issues can stem from a variety of causes, ranging from a simple loose connection to a more serious internal failure of the switch itself.
Identifying Common Symptoms, Battery switch on travel trailer function
Identifying the precise nature of the power problem is the first step in effective troubleshooting. For example, if only some appliances are affected, the problem might lie in a specific circuit breaker or fuse, rather than the battery switch itself. However, a complete lack of power from either battery bank strongly suggests a problem with the switch or its main power feed.
Rapid battery drain, even when appliances aren’t in use, indicates a parasitic draw, potentially a short circuit in the wiring connected to the switch.
Troubleshooting Steps for Power Issues
Before using a multimeter, try some basic checks. First, visually inspect all connections to the battery switch. Look for loose wires, corrosion, or any signs of damage. Tighten any loose connections and clean any corroded terminals. Next, check the circuit breakers and fuses in your trailer’s electrical panel.
A tripped breaker or blown fuse can mimic symptoms of a faulty battery switch. Replace any blown fuses with the correct amperage rating. If the problem persists after these initial checks, it’s time to move on to more advanced diagnostics.
Battery Switch and Component Inspection Checklist
A systematic inspection is crucial for efficient troubleshooting. This checklist helps ensure you cover all essential components:
Before beginning, disconnect the negative terminal from your battery to prevent accidental short circuits.
- Visual Inspection of the Switch: Examine the switch itself for any physical damage, loose screws, or signs of overheating.
- Wire Connections: Carefully inspect all wire connections to the switch, looking for loose wires, corrosion, or broken strands. Pay close attention to the positive and negative terminals.
- Circuit Breakers and Fuses: Check all circuit breakers and fuses both at the switch and within the trailer’s main electrical panel.
- Battery Terminals: Inspect the battery terminals for corrosion or looseness. Clean any corrosion with a wire brush and tighten loose connections.
- Wiring Harness: If possible, visually inspect the wiring harness leading from the battery to the switch, looking for any signs of damage or abrasion.
Testing the Battery Switch with a Multimeter
A multimeter allows for a more precise assessment of the battery switch’s functionality. Remember to always disconnect the negative battery terminal before proceeding.
The following tests assume a basic understanding of multimeter operation. If you are unsure how to use a multimeter, consult its instruction manual or seek assistance from someone experienced with electrical testing.
- Continuity Test: With the switch in the “off” position, set your multimeter to the continuity setting (usually represented by a diode symbol). Place the multimeter leads on the positive and negative terminals of the switch. You should get no continuity (no beeping sound). If you get continuity, it indicates a short circuit within the switch.
- Voltage Test: With the switch in the “on” position, set your multimeter to measure DC voltage. Measure the voltage across the positive and negative terminals of the switch. You should read a voltage close to the battery voltage. A significantly lower voltage reading could indicate a problem with the switch or a loose connection. Repeat this test with the switch set to each battery bank (if applicable).
Battery Switch Safety and Maintenance
Properly maintaining your travel trailer’s battery switch is crucial for safe and reliable power. Neglecting this vital component can lead to electrical fires, damage to your batteries and other equipment, and even personal injury. This section Artikels important safety precautions and maintenance procedures to ensure the longevity and safe operation of your battery switch.
Correct Fuse and Breaker Sizing
Using the correct size fuses and circuit breakers is paramount for safety. Oversized fuses and breakers won’t protect your system from overcurrent situations, potentially leading to overheating and fire. Undersized ones will trip frequently, interrupting power unnecessarily. Always consult the manufacturer’s specifications for your battery switch and the wiring gauge to determine the appropriate fuse and breaker ratings.
Incorrect sizing can lead to significant damage and safety hazards. For example, using a 30-amp fuse on a circuit designed for 20 amps risks overheating and potentially causing a fire.
Safety Precautions When Working with the Battery Switch and Electrical Systems
Working with batteries and electrical systems presents inherent risks. Always disconnect the negative (-) battery terminal before performing any maintenance or repairs on the battery switch or related components. This will help prevent accidental shorts and shocks. Wear appropriate safety glasses to protect your eyes from potential sparks or battery acid splashes. Ensure the area is well-ventilated to avoid the build-up of potentially explosive hydrogen gas from the batteries.
Never work on electrical systems while wet or in damp conditions. When working with tools, always use insulated handles to prevent electrical shocks.
Battery Switch Maintenance Best Practices
Regular maintenance prevents problems before they arise. A clean and well-maintained battery switch is less likely to malfunction. Regular inspection of connections for corrosion and tightness will prevent power loss and potential hazards. Addressing minor issues early can prevent major problems later. Remember to always follow the manufacturer’s instructions for your specific battery switch.
Recommended Maintenance Tasks
Regular maintenance is key to ensuring your battery switch operates safely and efficiently. Here’s a schedule of recommended tasks:
- Visual Inspection: Check for corrosion, loose connections, and any signs of damage. (Monthly)
- Connection Tightness: Verify that all connections are securely tightened. (Monthly)
- Corrosion Cleaning: Clean any corrosion from terminals and connections using a wire brush and baking soda solution. (Semi-annually)
- Fuse and Breaker Inspection: Inspect fuses and circuit breakers for signs of damage or blowing. Replace as needed. (Semi-annually)
- Switch Operation Test: Verify the switch operates smoothly and correctly switches power between batteries or shore power. (Annually)
- Professional Inspection: Consider a professional inspection every 2-3 years, particularly if you’re uncomfortable performing these tasks yourself. (Biennially/Triennially)
Battery Switch Upgrades and Modifications
Upgrading your travel trailer’s battery switch can significantly improve power management, safety, and convenience. A simple switch can be replaced with a more sophisticated system offering features like remote control, monitoring, and improved protection. This section explores the benefits of upgrading, the installation process, and different upgrade options.
Benefits of Upgrading to Advanced Battery Switch Systems
Modern smart battery switches offer several advantages over basic switches. These include remote operation, allowing you to control your battery power from inside your RV, even when the main power is off. Many also incorporate monitoring capabilities, providing real-time information on battery voltage and state of charge, preventing unexpected power drain and helping to extend battery lifespan. Some smart switches also offer superior surge protection and other safety features.
The improved control and monitoring capabilities minimize the risk of accidental disconnections or over-discharge, leading to a more reliable and worry-free power system.
Installing a New Battery Switch
Installing a new battery switch requires basic electrical knowledge and some hand tools. Safety is paramount; always disconnect the battery’s negative terminal before starting any work. The process generally involves removing the old switch, carefully noting the wiring configuration, and then installing the new switch, ensuring all connections are secure and properly insulated. Specific instructions will vary depending on the type of switch being installed.
Types of Battery Switch Upgrades
Several types of battery switch upgrades are available, each offering different features and capabilities. These include simple upgraded manual switches with better construction and higher amperage ratings, automatic switches that automatically disconnect the battery when voltage drops below a certain threshold, and sophisticated smart switches with remote control and monitoring features accessible through an app or control panel. Consider your budget and specific needs when choosing an upgrade.
For instance, a boondocking enthusiast might prioritize a smart switch with battery monitoring, while someone primarily using campground hookups might opt for a more basic but reliable manual upgrade.
Installing a Battery Disconnect Switch
Step 1: Preparation
Disconnect the negative terminal of your battery. Gather your tools: screwdriver (likely Phillips and flathead), wire strippers/cutters, crimp connectors, electrical tape, and the new battery disconnect switch. Identify the positive and negative battery cables. Choose a location for the switch that is easily accessible but protected from the elements.
Step 2: Wiring
Using wire strippers, carefully remove about ½ inch of insulation from the ends of the positive battery cable. Attach a crimp connector to each end of the positive cable. Attach one end of the positive cable to the input terminal of the disconnect switch and the other end to the positive battery terminal. Repeat this process for the negative cable, connecting it to the output terminal of the disconnect switch and then to the negative battery terminal.
Step 3: Mounting and Securing
Securely mount the disconnect switch to your chosen location using appropriate hardware. Ensure the switch is firmly attached and the wires are neatly routed and secured to prevent accidental disconnection.
Step 4: Testing
Reconnect the negative battery terminal. Test the switch by turning it on and off, ensuring the power flows as expected. Verify all connections are secure and there is no sparking or unusual heat. If everything functions correctly, the installation is complete.
Illustration: Imagine the battery disconnect switch mounted on a small panel near the battery. The positive cable from the battery is connected to the switch’s input terminal via a crimp connector. A similarly connected positive cable runs from the switch’s output terminal to the power distribution system of the trailer. The negative cable from the battery connects directly to the negative terminal of the power distribution system, bypassing the switch.
The switch acts as an on/off switch for the positive cable only, providing a complete power disconnect when turned off.
Understanding your travel trailer’s battery switch is key to a safe and enjoyable RVing experience. By following the safety precautions, performing regular maintenance, and understanding the power management aspects, you can avoid common problems and maximize your system’s lifespan. Knowing how to troubleshoot issues and potentially upgrade your system ensures you’re always prepared for any situation on the road.
So, get to know your battery switch—it’s a small component with a big impact on your adventures!
FAQ Section
What happens if my battery switch is left in the “off” position?
Leaving the switch off completely disconnects both your house batteries and the tow vehicle’s charging system. This prevents draining of your house batteries, but also means no power to your trailer appliances.
How often should I check my battery switch connections?
At least once a year, or more frequently if you notice any unusual power issues. Check for corrosion, loose connections, and any signs of damage.
Can I use a battery switch designed for a car in my travel trailer?
No. Travel trailers often require higher amperage switches to handle the demands of multiple appliances. Using an undersized switch is dangerous and could lead to overheating and fire.
What type of multimeter do I need to test my battery switch?
A basic multimeter with the ability to measure DC voltage and continuity is sufficient for most tests.
